The Art of Troubleshooting WordPress

If you are new to WordPress, or even if you have some experience, it may seem impossible to figure out why something isn’t working as expected. It would be nice if we could just wave a magic wand and have everything “fixed” automatically, but reality requires a bit more effort to diagnose and resolve issues. It would be impossible to describe troubleshooting steps for every possible issue, so this post stays focused on troubleshooting things in general.
The goal here is not to explain how to fix all of your problems, but rather to guide you through the basic process of troubleshooting stuff in WordPress.
Remember: troubleshooting is more of an art than a science, but there are proven strategies and steps to take if and when you get stuck.
Table of Contents
- The essentials
- Think logically
- Things to avoid
- Check the basics
- Roll back
- Debug mode
- Set up a default WP install
- Reset the database
- Start over
- Troubleshooting plugins
- Troubleshooting themes
- Troubleshooting specific issues
- Getting help
- Before asking for support
- Keep it real
- References
The essentials
Successful troubleshooting in WordPress begins with the following steps.
Understand what you’re doing
WordPress has made things easy. Arguably too easy. So there’s a lot of folks just jumping in without having any idea what they are doing. You wouldn’t drive a car without first understanding the basics. Like how to accelerate, brake, shift, turn, and so forth.
Likewise with WordPress, it is mission critical to understand at least the basics of the software. A solid understanding of WordPress just makes everything easier, including troubleshooting. And the good news is that there are millions of ways to go about learning WordPress basics. So take the time to research online and put everything together yourself.
Read the documentation
Always read the readme.txt and/or documentation for all themes and plugins. In my years working with WordPress, most of the questions I’ve received are plainly explained in the associated readme.txt. Most every plugin or theme hosted at WordPress.org must include a descriptive, well-defined readme.txt file.
As with many things, the best way to resolve issues is to avoid them in the first place. By always reading the readme.txt and/or other available documentation, you’re equipping yourself with the information needed to avoid errors while operating the plugin or theme successfully. So crack open the documentation — the solution may be right there waiting for you.
Check the Help tab
Use the “Help” tab in the Admin Area to get contextual information anytime. On most every screen in the WP Admin Area, there is a Help tab in the upper-right corner of the page. Clicking it reveals useful information that may help answer any questions. Good plugins also equip their pages with healthy Help menus, very useful for learning how things work and configuring stuff.
Check the WP Codex
Another useful source of information is the WordPress Codex. It provides detailed information about most every aspect of WordPress. If you get stuck with something, or plan on doing something where you might get stuck, take some time to research the relevant pages at the Codex. Hard to go wrong with the official documentation.
Search for clues
Getting a handle on some tricksy bug or problem can seem like an overwhelming task. Especially if you’re new to the game and are unfamiliar with whatever script or issue you are dealing with. To get a solution going, try searching for any related information. There is an abundance of useful WordPress information online, and chances are that someone already has been there, done that, and posted about it online. I mean seriously, WordPress powers over 20% of the entire Web, so odds are good that you’ll find some sort of useful infos via search engine. So pick a few relevant keywords that are related to your issue and see if anyone else out there has posted a solution, clues, or anything that will help.
Clear all browser data
Browsers remember a lot of stuff about the pages and resources that you visit. In order to make sure that you are testing the latest code, make sure to clear your browser’s cookies, cache, form data, and/or anything else you are working with. I like to use multiple browsers, with several kept in perpetual “clean” mode with absolutely no stored history or data whatsoever.
Update WordPress
Make sure you are running the latest version of WordPress and all plugins. It’s the best way to rule out issues related to incompatibility due to running outdated versions.
Keep backups
Always make sure you are keeping tested and complete backups for your site. Backups should include files and the database. It doesn’t matter how you get there, as long as you have backups to restore previous functionality as needed. Remember, it’s not enough to back up your site — you have to test the backups themselves to ensure that they are complete and working properly.
Again, these are the essential things that you should be doing regardless of bugs or problems. Just good advice in general. Once you’ve covered these bases, read on to learn more troubleshooting techniques, tricks and tips.
Think logically

Whenever troubleshooting, be like Spock and try to think logically about the issue at hand. Remember, ultimately you’re dealing with scripted logic, so theoretically it always is possible to determine the cause of an issue.In general, troubleshooting involves defining and replicating the issue, eliminating extraneous variables, and performing sufficient tests to verify the hypothesis. Here is a quick summary of each of these concepts, which are useful in breaking down problems and identifying potential solutions.
Definition
In order to understand what you are trying to fix, it is helpful to be able to describe or define it. For example, saying “Oh noes! WordPress is not working!” essentially is useless information. A step better would be something specific like, “My homepage is not loading.” Even better would be like, “My homepage is not loading the correct theme template.” Continuing this logic, eventually the definition of the issue would pretty much point to a solution, for example:
“My homepage is not loading the correct theme template when my Reading settings are set to display a static posts page for the front page.”
In this scenario, the definition itself begs the solution, which would involve ensuring that the theme includes the proper template file. The more succinctly you can define an issue, the better equipped you are to resolve it.
Replication
In order to determine any sort of solution, it must be possible to consistently replicate the issue. Once an issue can be replicated, it can be tested and observed. For example, let’s say that you are using an e-commerce plugin that fails to process certain transactions. It works some of the time, but not all of the time. Sure you could begin changing settings and tweaking codes in hopes that something will click. But it would be much better to be able to replicate a failed transaction and limit your testing to that particular case. Replication ensures that the actions you are taking are being applied to the correct outcome.
Elimination
In order to isolate and determine the issue, it is important to eliminate as many extraneous variables as possible. For example, let’s say that you have just activated 50 plugins all at once (yikes!). And now your pages are not loading on the front-end. In order to determine which (if any) plugin is causing the issue, you can begin by eliminating as many variables (i.e., plugins) as possible.
Disabling all plugins and trying again to load the homepage will tell you immediately if the issue is caused by one or more or your many plugins. If the homepage suddenly loads again, then you can begin re-enabling plugins one at a time until the culprit is found. The process of elimination is a powerful tool for troubleshooting just about anything.
Testing
With these strategies, you are equipped to begin testing potential hypotheses for validation. Essentially, when you get into the art of troubleshooting stuff, you are working with the same principles and concepts as are employed in scientific research: studying current conditions, defining a hypothesis, performing tests, analyzing data, and arriving at a conclusion. For more serious learning in this arena, queue up any beginner literature on the scientific method. It’s good stuff, and a lot of fun too 🙂
Things to avoid
Just as there is a list of “essential” things that will make your WordPress-powered life easier, there also is a list of things that will make your life more difficult:
Bulk plugin activation
Don’t activate a bunch of plugins all at the same time. I see this over and over again. People install fistfuls of plugins and then activate them all at once, expecting everything to just “work” perfectly. Rarely is that the case, so it’s recommended to take the time to activate one plugin at a time. That way you can configure the plugin and verify proper functionality in clean, systematic fashion. Otherwise if you just mass activate a whole pile of plugins and there is some error or conflict, you’ll have no idea which plugin is the culprit, and will have to waste a bunch of time trying to figure it out.
Shady plugins and themes
Whenever possible get your plugins and themes from WordPress.org. If you must go to a 3rd-party site, make sure that it is reputable and trustworthy. Anything less and you are taking a big risk. Malicious code commonly is found in plugins and themes shared on “warez” and “pirate” type “sharing” sites.
In general it’s just always a bad idea to download illegal copies of anything involving code (or illegal copies of anything, for that matter). It’s way too easy and tempting for ignorant people to inject scummy exploit scripts and other malicious nonsense. Steering clear of shady sites and sticking with the official source is gonna help keep your site safe and give you piece of mind.
Running a zillion plugins
So many times I’ve logged into someone’s site to try and help resolve some issue, only to discover the nightmare scenario of “WAAYY TOOO MANNY PLUGINZZ!!!”. Seriously, I can understand 10-20 WordPress plugins to get the job done, but 50 plugins?!?! 100 plugins?!?
Ranting aside, I encourage people to go with a more moderate approach and install only those plugins that absolutely are necessary. Unless you are careful about it, activating crazy numbers of plugins will only complicate things, increase maintenance load, and waste precious resources like bandwidth, memory, and time. More plugins = more liability.
3rd-party services
Okay so in general it’s fine and safe to use third-party services and integrate them with your WordPress-powered site. BUT it is important to be mindful of the potential downsides and consequences of doing so. Make sure you fully understand what any 3rd-party functionality is doing before granting open access to your database and files.
For example, if you are having issues with something and can’t figure it out, double-check to see if any 3rd-party scripts or plugins are involved and possibly doing something unexpected. It’s one thing to keep tabs on everything that you are doing with your site, but it can be difficult to know exactly what changes, say, Facebook is making to their API, widgets, and so forth. APIs change constantly, so if you plug into one, make sure to be mindful of what it’s doing.
Modifying the core
When working with WordPress, never make changes to the core files. Same goes for plugins and themes. Don’t modify the core files in any way. Doing so invites more problems and should not be considered a solution for whatever bug or issue you are trying to resolve. If you need to make changes to core functionality, use a plugin or the theme’s functions.php file. That is, after all, why they exist in the first place.
Check the basics
When in doubt, it’s always a good idea to go through all of the basic troubleshooting steps:
Check the documentation
Always check the theme or plugin documentation for important information. Often, known bugs will be reported with possible workarounds and solutions. Repeat: always read the documentation. I can’t emphasize this enough.
Inspect all settings
Before using a plugin or theme, take the time to inspect all of its settings and options. Many times there will be some obscure (or obvious) setting that is changing the way the plugin operates. So if you are trying to diagnose and resolve an issue, going through each plugin setting may reveal a simple, one-click solution.
Check the error logs
Every site should have some sort of error-logging and access-logging mechanism in place. Error and access logs enable you to investigate what, when, where, and why errors and other issues may be happening on the server. They provide a goldmine of information and really are indispensable tools for anyone working online. If you are not sure about your own site’s access/error logs, ask your host — they should be more than happy to help you find them.
Check functions.php
If you are trying to diagnose some theme-related issue, check any custom scripts that may be added via the theme’s functions.php file. Check any newly added functions or use the halving method to determine if any code in functions.php is at issue.
The halving method basically works just like it sounds: when encountering problematic portions of code (such as a blacklist, firewall, or stylesheet), isolate the offending directive(s) by first removing one half of the code and checking for desired functionality. If things are still not working, remove another half of the code and test again. Wash rinse repeat. Then, as soon as proper functionality returns, replace the only the last portion of code that was removed and continue the process. Very quickly, usually after two or three iterations of this process, the problematic code will be easily identifiable.
Check for syntax errors
How many times have you traced an issue back to some obvious syntax error? It’s happened to me countless times. Whenever troubleshooting, take a fresh look at whatever code you are working with and look for any subtle typos or other coding mistakes. Maybe take a break before doing so in order to refresh your eyeballs and look at the code from a fresh perspective, or ask a fellow developer to take a look. Hopefully whatever code-editing software you are using does syntax highlighting and makes it easy to spot any errors.
Other details
Additionally, when troubleshooting remember to check the following:
- Custom directives in
wp-config.php - Custom directives in
php.ini - Custom directives in any
.htaccessfile(s) - Settings/directives set via your server control panel
If any of these items are in play, they could be at issue. Investigate thoroughly!
Roll back
If you get stuck while working on your site, try stepping back through your previous actions. In web development this is referred to as “rolling back” to a previous verion or build. For example, if you’ve just updated some awesome plugin and the latest version is causing problems, you may want to roll back to the previous version, at least until the error can be reported to the developer and resolved (i.e., don’t stick with an old version).
Similarly, if you are making changes to your site and something stops working properly, try “undoing” whatever prior steps were taken. You know, go back to the last known working state and try again from there. Often doing so will reveal any missteps or incompatibilities.
Debug mode
Another great way to troubleshoot is to run WordPress in “debug” mode. Debug mode provides errors, warnings, and notices that can reveal priceless information regarding what is happening (or not happening) under the hood. As explained in the WP Codex, you can enable debug mode by setting WP_DEBUG to true in the wp-config.php file, like so:
define('WP_DEBUG', true); // enable debug modeOnce you’re finished checking things, change true back to false (without the quotes) to disable debug mode. Refer to the WP Codex for all the details. In addition to WordPress’ built-in debugging functionality, there are some excellent plugins available at the Plugin Directory:
Debugging code is an important part of the development process, so if the authors of your themes and plugins are doing their part, debugging should reveal that everything is squeaky clean, or as close to it as possible. If you do discover a bug in a theme or plugin, contact the developer. If you discover a bug in the WordPress core, follow the steps outlined in the Reporting Bugs guide at the WordPress Codex.
Tip: When it comes to PHP, there is a distinct difference between Notices, Warnings, and Errors. Seeing Errors and Warnings in your error log is not a good thing, but Notices are nothing to worry about 99.9% of the time; rather, Notices exist to communicate information to developers about best practices and related information.So if you’re seeing Notices and feel the need to complain, take a moment and check yourself: Notices are completely harmless. If you don’t like seeing them, disable debug mode or change the PHP error-reporting level on your server.
Set up a default WP install
If some plugin or theme is not working on your current WordPress site, try setting up a default installation of WordPress for testing. The logic here is that most themes and plugins are tested at least on a default WordPress setup, so replicating that environment will give you a baseline and enable you to verify that things are working as expected. It also enables you to compare the differences between the default WordPress site and the site for which the theme or plugin is not working.
The default installation should be exactly as installed out of the box with no changes to anything. Do not modify any of the settings, plugins, or themes. This gives you a suitable platform for testing proper functionality for themes and plugins.
For example, let’s say that you are building a WordPress site and have customized things quite a bit. Then you install a new plugin and something breaks or the plugin does not work as advertised. Having a default installation of WordPress available makes it easy to determine if the plugin works in the first place. Just install and activate it on the default WP install and see if it works. If it does work, then you can begin troubleshooting the differences between your site and the test site.
Going further, you can begin recreating your site on the test site, testing after each step to see if the plugin (or whatever script) stops working. That will tell you exactly which aspect of your setup is conflicting with the plugin.
On the other hand, if the plugin doesn’t work on default WordPress, then you should seek support of the plugin developer.
Reset the database
If you’re working on a new site that doesn’t yet house any content, you may want to try resetting the database to resolve any issues. There are some good plugins available for doing this (see links below) and of course it’s also possible to do it manually by simply deleting the old database and visiting the installation file, /wp-admin/install.php, in your browser. Doing so will initiate the installation process and recreate the database anew.
Tip: Even if there are no issues with your site, resetting the database after experimenting with a bunch of new themes and plugins is a great way to clean up any leftover data before finalizing configuration and customization for production.
Explore the Plugin Directory for other options and tools for working the WordPress database.
Start over
If all else fails and things are too complicated to troubleshoot or reverse engineer the issue, try setting up a fresh installation of WordPress and recreating your site piece by piece. Yes it takes some time to set up another database and install WordPress, but doing so enables you to discover the issue as it occurs in the timeline of your site’s development. In fact, in some cases the issue may be resolved simply by resetting the database and uploading a fresh set of files. Starting over may be just the ticket when things get too complicated.
Troubleshooting plugins
If you activate or update a plugin or theme and something stops working, it’s most likely the plugin or theme that’s causing the issue. This is why it’s a good idea to install and configure plugins one at a time, verifying proper functionality for each one along the way. If you’re not sure which plugin or theme is causing the issue, there is a proven strategy for diagnosing which one is at fault. Here is the general process:
- Some functionality is not working properly
- To diagnose the issue, temporarily disable all plugins
- Then reactivate each plugin, one at a time, testing for proper functionality after each
If you are troubleshooting a specific plugin, then you would disable all plugins except for that particular plugin. The whole idea here is to eminate variables in order to determine exactly which plugin (if any) is causing the issue. Here is a graphic to help visualize the process:
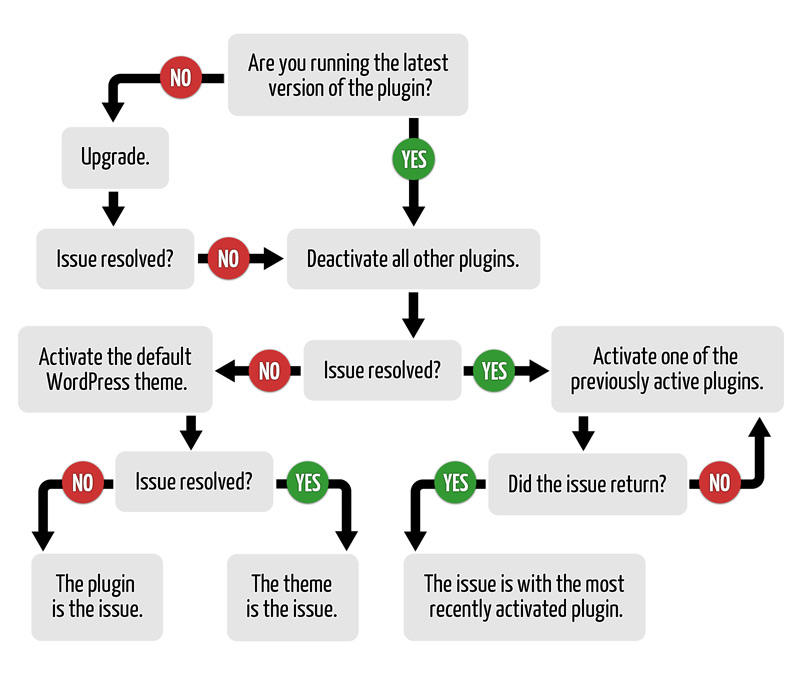
Troubleshooting WordPress Plugins (click image for larger view)
I’ve used this method countless times to isolate problem plugins on client sites where many plugins are in use. If your site is running a lot of plugins, it may be easier to set up a test WordPress installation.
Note: Before disabling any plugins, you may want to implement “maintenance mode”. This is easiest to do with a plugin, but that doesn’t make sense if you’re disabling plugins to diagnose issues. Fortunately, maintenance mode is easy to do with .htaccess.
Troubleshooting themes
Basically the same idea as troubleshooting plugins, only using themes instead. For example, to determine whether or not your theme is responsible for some tricksy bug, try switching to one of the default WordPress themes. If the bug persists, the issue is not with your theme. If the bug disappears, the issue is with your theme.
Examples of troubleshooting specific issues
These specific examples show some troubleshooting steps that can be taken to diagnose specific issues. Following the logic behind each step should give you a better idea of how to apply such strategy to troubleshooting issues in general.
Shortcode not working
A great example that illustrates the troubleshooting process can be seen with a help request that I received a while ago. The request was to help figure out why some shortcode was not working on site. Here is the gist of my reply, which explains some logical steps to take in order to rule out extraneous variables and determine the cause of the issue:
- Try creating a gallery in any post to see if WordPress shortcodes are working
- Try any other 3rd-party shortcode to see if theme/plugin shortcodes are working
- Try placing the shortcode on a different Post or Page to rule out location as the issue
- Try placing the shortcode in any widgetized sidebar to rule out location as the issue
- Try putting the shortcode in the WP text widget to see if there is any issue
- Try
<?php echo do_shortcode('[shortcode]'); ?>in theme template - Try the shortcode in the default WordPress theme to rule out any theme-related issue
- Try disabling plugins to rule out any conflicts in that department
This is not a comprehensive list of things to check when troubleshooting shortcodes, but it was enough to help the person sort things out and resolve the issue.
Email not working
So you are having issues with email not working in WordPress (or anywhere else for that matter). Perhaps it seems like WordPress is not sending the emails. Or maybe the emails are sent but not received. Or not received only at Hotmail or other specific service(s). When you are experiencing email issues, keep in mind that there are many factors involved, including:
- WordPress
- Active WP theme
- Plugins
- Custom scripts
- Server software
- Hosting rules/policy
- DNS/domain protocols
- Network functionality
- Spam-blocking scripts
- 3rd-party services like Gmail, Hotmail, et al
- Email headers
- Ad nauseam..
All of these factors makes email one of the most difficult things to troubleshoot. There is a plugin that may help rule out a few of these items, called Check Email. You can begin there and continue investigating until the issue can be determined. The check-email plugin lets you know if the issue is with WordPress or elsewhere. Unfortunately resolving email issues requires a fair amount of investigation, so roll up your sleeves and get to work.
Updates not working
When it comes to automatic/one-click updates, there are numerous factors that should be investigated:
- Check the site’s error log for any revealing errors
- Troubleshoot plugins (security plugins, firewall plugins, et al)
- Troubleshoot active theme (custom scripts in
functions.php, etc.) - Check any custom code included in
wp-config.php - Check any relevant
.htaccessdirectives - Check any firewall or interfering rules set up on the server
- Check any firewall or interfering rules set up by the web host
For a more detailed look into various factors that could cause this issue, check out What to do when Auto-Update Fails at DigWP.com. Plus, here are a few additional resources that may be useful when diagnosing outbound HTTP requests:
Getting help with WordPress
There are many good places to get help with WordPress. Of course, the quickest way to find exactly what you’re looking for is to do a few quick searches with your favorite search engine. For example, if you’re having issues with a specific plugin, search the Web for the plugin’s name plus any relevant keywords. If nothing useful turns up, here are some general resources for getting help:
- WordPress Support Forums
- WordPress Codex Guide to Troubleshooting
- WordPress Codex Guide to Finding Help
- WordPress IRC Live Help
- WordPress Questions
- List of WordPress Developers & Designers
- Where to get help with WordPress
Familiarizing yourself with these resources may prove useful as you go further with WordPress. If you’re adept at searching, you should be able to find just about anything. If nothing useful is found, you may need to contact a developer.
Before asking for support
After exhausting all possible troubleshooting steps, you may want to contact a developer or other support venue for help. Here are some things to include in your support request:
- A clear, succinct description of the issue and how to replicate it
- Any relevant screenshots showing what’s happening
- The name and description of any related error messages
- The URL of your site and/or any relevant posts or pages
- The name(s) of any relevant plugin or theme
- Any steps or potential solutions that you’ve already tried
Additionally, it’s wise to not bomb your developer with a bunch of requests at the same time. Much better to get help with one issue at a time. Doing so can be respectful and helps to keep communication organized and on track.
Keep it real
Troubleshooting is a fundamental aspect of working online. Bugs and issues are an intrinsic part of what we do. Experienced developers have well-established debug and troubleshooting routines in place, and beginners should practice their skills as much as possible. The next time you get stuck, use this guide to help diagnose and resolve the issue. Doing your own troubleshooting is a priceless skill to have, and can save a lot of time in the long run.